Multiple Images Uploading With CarrierWave and PostgreSQL Array
Notice: there are two known issues with this approach, see issue 1 and issue 2.
And Your mileage may vary.
Notice 2: if you counter last image deletion bug or all images deletion issue, refer to this github issue for fix.
TL;DR. Jump to fully completed sample codes on Github.
In this blog post I am going to demonstrate how to implement multiple images uploading related features by using CarrierWave and PostgreSQL Array, and I am going to illustrate the technique in the context of a sample gallery application.
To be specific about the features, we are going to implement the following ones:
- Create a new gallery by uploading multiple images
- Upload more images into existing gallery
- Delete specific image from existing gallery (one at a time)
And roughly I am going to build this sample application in the following way:
- Use Rails 4.2.5 as the overall framework
- Use CarrierWave as the gem for handling multiple files uploading. And I am going to use the master branch, since according to the documentation, this feature is only enabled on the master branch
- Use PostgreSQL as the database, and particularly exploit the convenient
arraytype supported by PostgreSQL for storing a sequence of "images" - Use Amazon S3 for storing the actual images uploaded
- Use Slim as the template engine and some HTML5 features, particular the <input> multiple attribute (eg.
<input type="file" name="imgs" multiple>)
And now let’s build this application step by step.
Step 1 Setup the Rails application
First let’s run rails new sample-gallery-app-with-carrierwave to generate a new Rails applicaiton which we are going to work on.
And inside file Gemfile, I specify the Ruby version to 2.3.0 by adding ruby "2.3.0".
Next let’s remove gem sqlite3, and add following gems
gem "pg", "0.18.4"
gem "slim-rails", "~> 3.0.1"
gem "carrierwave", :github => "carrierwaveuploader/carrierwave"
gem "fog-aws"
And now let’s configure config/database.yml to use postgresql instead of sqlite3.
Finally, let’s run bundle to get everything installed.
Step 2 Configure CarrierWave
Let’s create the initialization file config/initializers/carrier_wave.rb and copy & paste in the example configuration from the official documentation.
CarrierWave.configure do |config|
  config.fog_provider = 'fog/aws'                        # required
  config.fog_credentials = {
    provider:              'AWS',                        # required
    aws_access_key_id:     'xxx',                        # required
    aws_secret_access_key: 'yyy',                        # required
    region:                'eu-west-1',                  # optional, defaults to 'us-east-1'
    host:                  's3.example.com',             # optional, defaults to nil
    endpoint:              'https://s3.example.com:8080' # optional, defaults to nil
  }
  config.fog_directory  = 'name_of_directory'                          # required
  config.fog_public     = false                                        # optional, defaults to true
  config.fog_attributes = { 'Cache-Control' => "max-age=#{365.day.to_i}" } # optional, defaults to {}
end
You will need to replace sample credentials with yours.
And then Let’s generate our image uploader by calling rails generate uploader Image, this should generate a new file at path app/uploaders/image_uploader.rb.
For this newly generated uploader, let’s change the storage from from :file to :fog (change line storage :file to storage :fog).
Step 3 Scaffolding the basic
Now we have the our uploader ImageUploader, let’s could go ahead scaffolding out our application.
Let’s Run rails g scaffold gallery title:string, and add mount_uploaders :images, ImageUploader into the Active Record class, so that our /app/models/gallery.rb looks like
class Gallery < ActiveRecord::Base
  # BE CAREFUL, IT'S plural mount_uploaderS, not singular mount_uploader
  mount_uploaders :images, ImageUploader # mount the uploaders
end
Then lets create the images related migration by calling:
rails g migration AddImagesToGallery
And in the generated migration file, let’s write
class AddImagesToGallery < ActiveRecord::Migration
  def change
    add_column :galleries, :images, :string, array: true, default: [] # add images column as array
  end
end
This is how we add a array column images to our galleries table for holding images.
Next let’s run rake db:migrate and rake db:setup to get our database updated.
Step 4 Implement create gallery feature
Let’s edit app/views/galleries/_form.html.slim file to add a multiple files field to the form.
.field
  = f.file_field :images, multiple: true # make this input a multiple files input
Then let’s edit the #gallery_params method of GalleriesController to accept multiple images.
def gallery_params
  params.require(:gallery).permit(:title, {images: []}) # allow nested params as array
end
Next let’s edit the index and show views to display the images we uploaded.
Let’s add the following codes into app/views/galleries/index.html.slim
td
  - gallery.images.each do |image| # for each image
    = image_tag(image.url) # display the image
And also add the following codes into app/views/galleries/show.html.slim
div
  - @gallery.images.each do |image|
    = image_tag(image.url)
Now let’s start our Rails application and hit http://localhost:3000/galleries/new to create a gallery.
After creation you should see something like the following screenshot when visiting http://localhost:3000/galleries.

Step 5 Implement add more images feature
In step 5 let’s modify our routes, and nest an images resources under galleries resources, so that our config/routes.rb file should look like something below
Rails.application.routes.draw do
  resources :galleries do
    resources :images, :only => [:create]
  end
end
And now let’s generate the images controllers by calling rails generate controller Images.
Then let’s write the actual codes responsible for adding more images into existing gallery.
class ImagesController < ApplicationController
  before_action :set_gallery

  def create
    add_more_images(images_params[:images]))
    flash[:error] = "Failed uploading images" unless @gallery.save
    redirect_to :back
  end

  private

  def set_gallery
    @gallery = Gallery.find(params[:gallery_id])
  end

  def add_more_images(new_images)
    images = @gallery.images # copy the old images
    images += new_images # concat old images with new ones
    @gallery.images = images # assign back
  end

  def images_params
    params.require(:gallery).permit({images: []}) # allow nested params as array
  end
end
And as you could see in the codes, when we need to add more images we simply add more images into the array attribute , and save the gallery object afterwards.
Now let’s modify the show view to take advantage of this ImagesController by adding the following codes
h1 Add more images

= form_for @gallery, url: gallery_images_path(@gallery), method: :post do |f| # use customized url endpoint
  .field
    = f.file_field :images, multiple: true

  .actions = f.submit "Add More Images"
Now we let’s visit show page of a single individual gallery, and we should be able to use the form there to add more images to existing galleries.
Step 6 Implement remove single image feature
Now let’s implement the remove single image feature.
Firstly let’s update routes to
Rails.application.routes.draw do
  resources :galleries do
    resources :images, :only => [:create, :destroy] # support #create and #destroy
  end
end
The let’s implement the actual #destory action of ImagesController, so that the controller should looks like this:
class ImagesController < ApplicationController
  before_action :set_gallery

  def create
    add_more_images(images_params[:images])
    flash[:error] = "Failed uploading images" unless @gallery.save
    redirect_to :back
  end

  def destroy
    remove_image_at_index(params[:id].to_i)
    flash[:error] = "Failed deleting image" unless @gallery.save
    redirect_to :back
  end

  private

  def set_gallery
    @gallery = Gallery.find(params[:gallery_id])
  end

  def add_more_images(new_images)
    images = @gallery.images
    images += new_images
    @gallery.images = images
  end

  def remove_image_at_index(index)
    remain_images = @gallery.images # copy the array
    deleted_image = remain_images.delete_at(index) # delete the target image
    deleted_image.try(:remove!) # delete image from S3
    @gallery.images = remain_images # re-assign back
  end

  def images_params
    params.require(:gallery).permit({images: []}) # allow nested params as array
  end
end
As shown in the codes, when we want to delete certain image, we first remove the image from the array, then delete the image from S3, and lastly re-assign the modified images array back to gallery object.
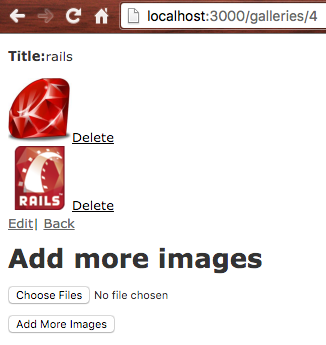
Now let’s modify our show view to use this action.
Let’s modify the code block we used to display the images to
div
  - @gallery.images.each_with_index do |image, index| #grab the index
    div
      = image_tag(image.url)
      = link_to "Delete", gallery_image_path(@gallery, index), :method => :delete, data: { confirm: "Are you sure you want to delete this image?" }
      # generate the delete link url by using helper gallery_image_path with image index
Now when you visit a gallery, you should see something like following screenshot
Congraulations!
Now you have completed the tutorial, and finish the three features we set to complete, you are good to go ahead refactoring those codes so that you could put them into productions.
You should move the add/remove related codes into two service classes, add some validations here and there, enhance the error messages, improve the front-end user experience, and make the codebase more robust, but they are out of the scope of this blog post, thus not covered here.
That’s all for this post.
Happy coding.
Till next time.